
# Development
- Standards
- GIT
- BIT
- What do you Need?
- Setup Bit
- Install Bit Cli
- Login in your Bit Account
- Initialize Bit Workspace
- Install Compiler
- Share a Component
- Tag the component version
- Export Component
- Preview the Component
- Install Component in Another Project
- Use in your application
- Edit component from a repository with a bit component published
- Conflict with a tag version
- Automated Changelog
- Issues Management
- Header Code Comments
# Standards
# Coding Style
Our code must be as clean and easy to read as possible.
That is actually the art of programming – to take a complex task and code it in a way that is both correct and human-readable. A good code style greatly assists in that.
# Tabs vs Spaces
Let's start with the religious problems first. Our PLUSTEAM founders have chosen tabs indention for the first project of the company, so you would do well to follow their choice.
# Variable declarations
Declare one variable per var statement, it makes it easier to re-order the lines. Ignore Crockford on this, and put those declarations wherever they make sense.
# Variable and property names
Variables and properties should use lower camel case capitalization. They should also be descriptive. Single character variables and uncommon abbreviations should generally be avoided.
# Class names
Class names should be capitalized using upper camel case.
# Constants
Constants should be declared as regular variables or static class properties, using all uppercase letters.
# Object / Array creation
Use trailing commas and put short declarations on a single line. Only quote keys when your interpreter complains
# Conditions
Any non-trivial conditions should be assigned to a descriptive variable
# Braces are used where optional
Braces are used with if, else, for, do and while statements, even when the body is empty or contains only a single statement.
# Code Style Standards
At PLUSTEAM we use the Google Style Guide scheme. You should set it easily in your text editor.
# In WebStorm IDE
- Go to Preferences
- Editor
- Code Style
- JavaScript
- Click Set from Predefined Style
- Standard change it for the scheme chosen Google Javascript Style Guide.
This style will then replace your current scheme. Take a look at Jetbrains Code style
# GIT
# Branches
Our development model follow the Git-Flow branching model created by Vincent Driessen. It is very well suited to collaboration and scaling the development team. You can find more info here and here.
# Main Branches
The central repo holds two main branches with an infinite lifetime, these branches will be blocked and only can be updated using pull/merge requests:
master: Contains the stable version of the project used on the production server.
develop: Contains the latest delivered development changes for the next release.
# Supporting branches
Next to the main branches master and develop, our development model uses a variety of supporting branches to aid parallel development between team members, ease tracking of features, prepare for production releases and to assist in quickly fixing live production problems. Unlike the main branches, these branches always have a limited life time, since they will be removed eventually.
- Feature branches: Feature branches are used to develop new features for the upcoming or a distant future release. New development (new features, non-emergency bug fixes) are built in feature branches.
The developer must create a new branch off from the develop branch and the name must starts with “feature/“ followed by the task name or feature name. For example “feature/login_view”. Finished features and fixes are merged back into the develop branch when they’re ready for release.
- Release branches: Release branches support preparation of a new production release. Furthermore, they allow for minor bug fixes and preparing meta-data for a release (version number, build dates, etc.). By doing all of this work on a release branch, the develop branch is cleared to receive features for the next big release.
At some point when we achieve a stable point into develop branch that contains tested features we must create a release branch that start with “release/“ followed by the release name. For example “release/admin_module”.
The code in this branch is deployed onto a suitable test environment, tested, and any problems are fixed directly in the release branch. When the release is finished, the release branch is merged into master and into develop too, to make sure that any changes made in the release branch aren’t accidentally lost by new development.
- Hotfix branches: Hotfix branches are used to create emergency fixes. These branches are very much like release branches in that they are also meant to prepare for a new production release, albeit unplanned. They arise from the necessity to act immediately upon an undesired state of a live production version.
When a critical bug in a production version must be resolved immediately, a hotfix branch must be branched off from the corresponding tag on the master branch that marks the production version. This name of this branch must start with “hotfix/“ followed by the hotfix name. For Example “hotfix/payment_exception”.
When the hotfix is finished is merged back into both master and develop to make sure that the hotfix isn’t accidentally lost when the next regular release occurs.
NOTE: Modern Git clients like GitKraken already have this feature.
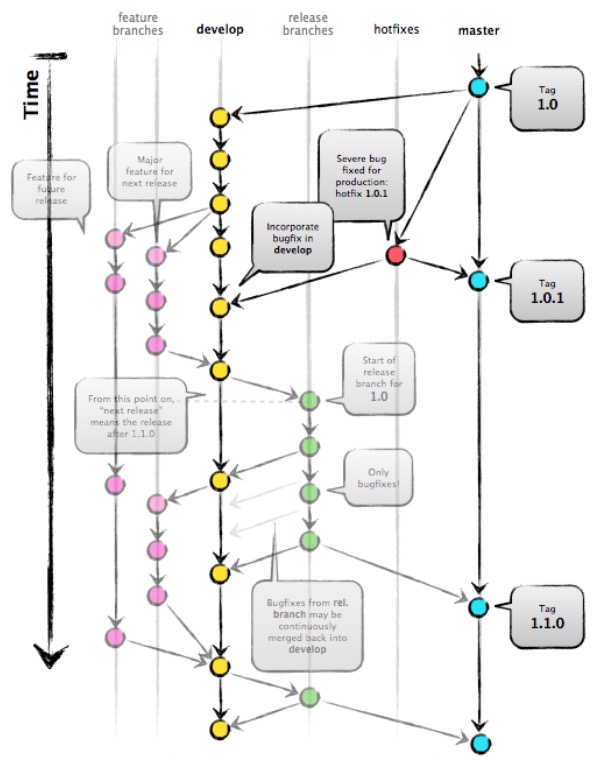
This is an example of how must be the branches workflow
# GitFlow
Our Git Client is GitKraken
# Use
- Activate Gitflow (Once per repository)
- To start contributing just create a new feature as shown:
- When you finish your work(after you tested) do a Pull/merge requests
# Pull/merge requests
Main Branches (master and develop) are blocked by default and only can be updated using pull/merge requests that come from the supporting branches.
The pull/merge requests must be evaluated by a Code Review process. In this process, The team evaluate the code in terms of quality, readability.
All issues/improvements are added as comments in the platform used. Only after completing all activities the MR/PR is merged.
# Creating a Pull Request
Make sure that you commited all changes, then enter to git GitKraken and start a pull request
Once you do it click on the option Edit on Gitlab
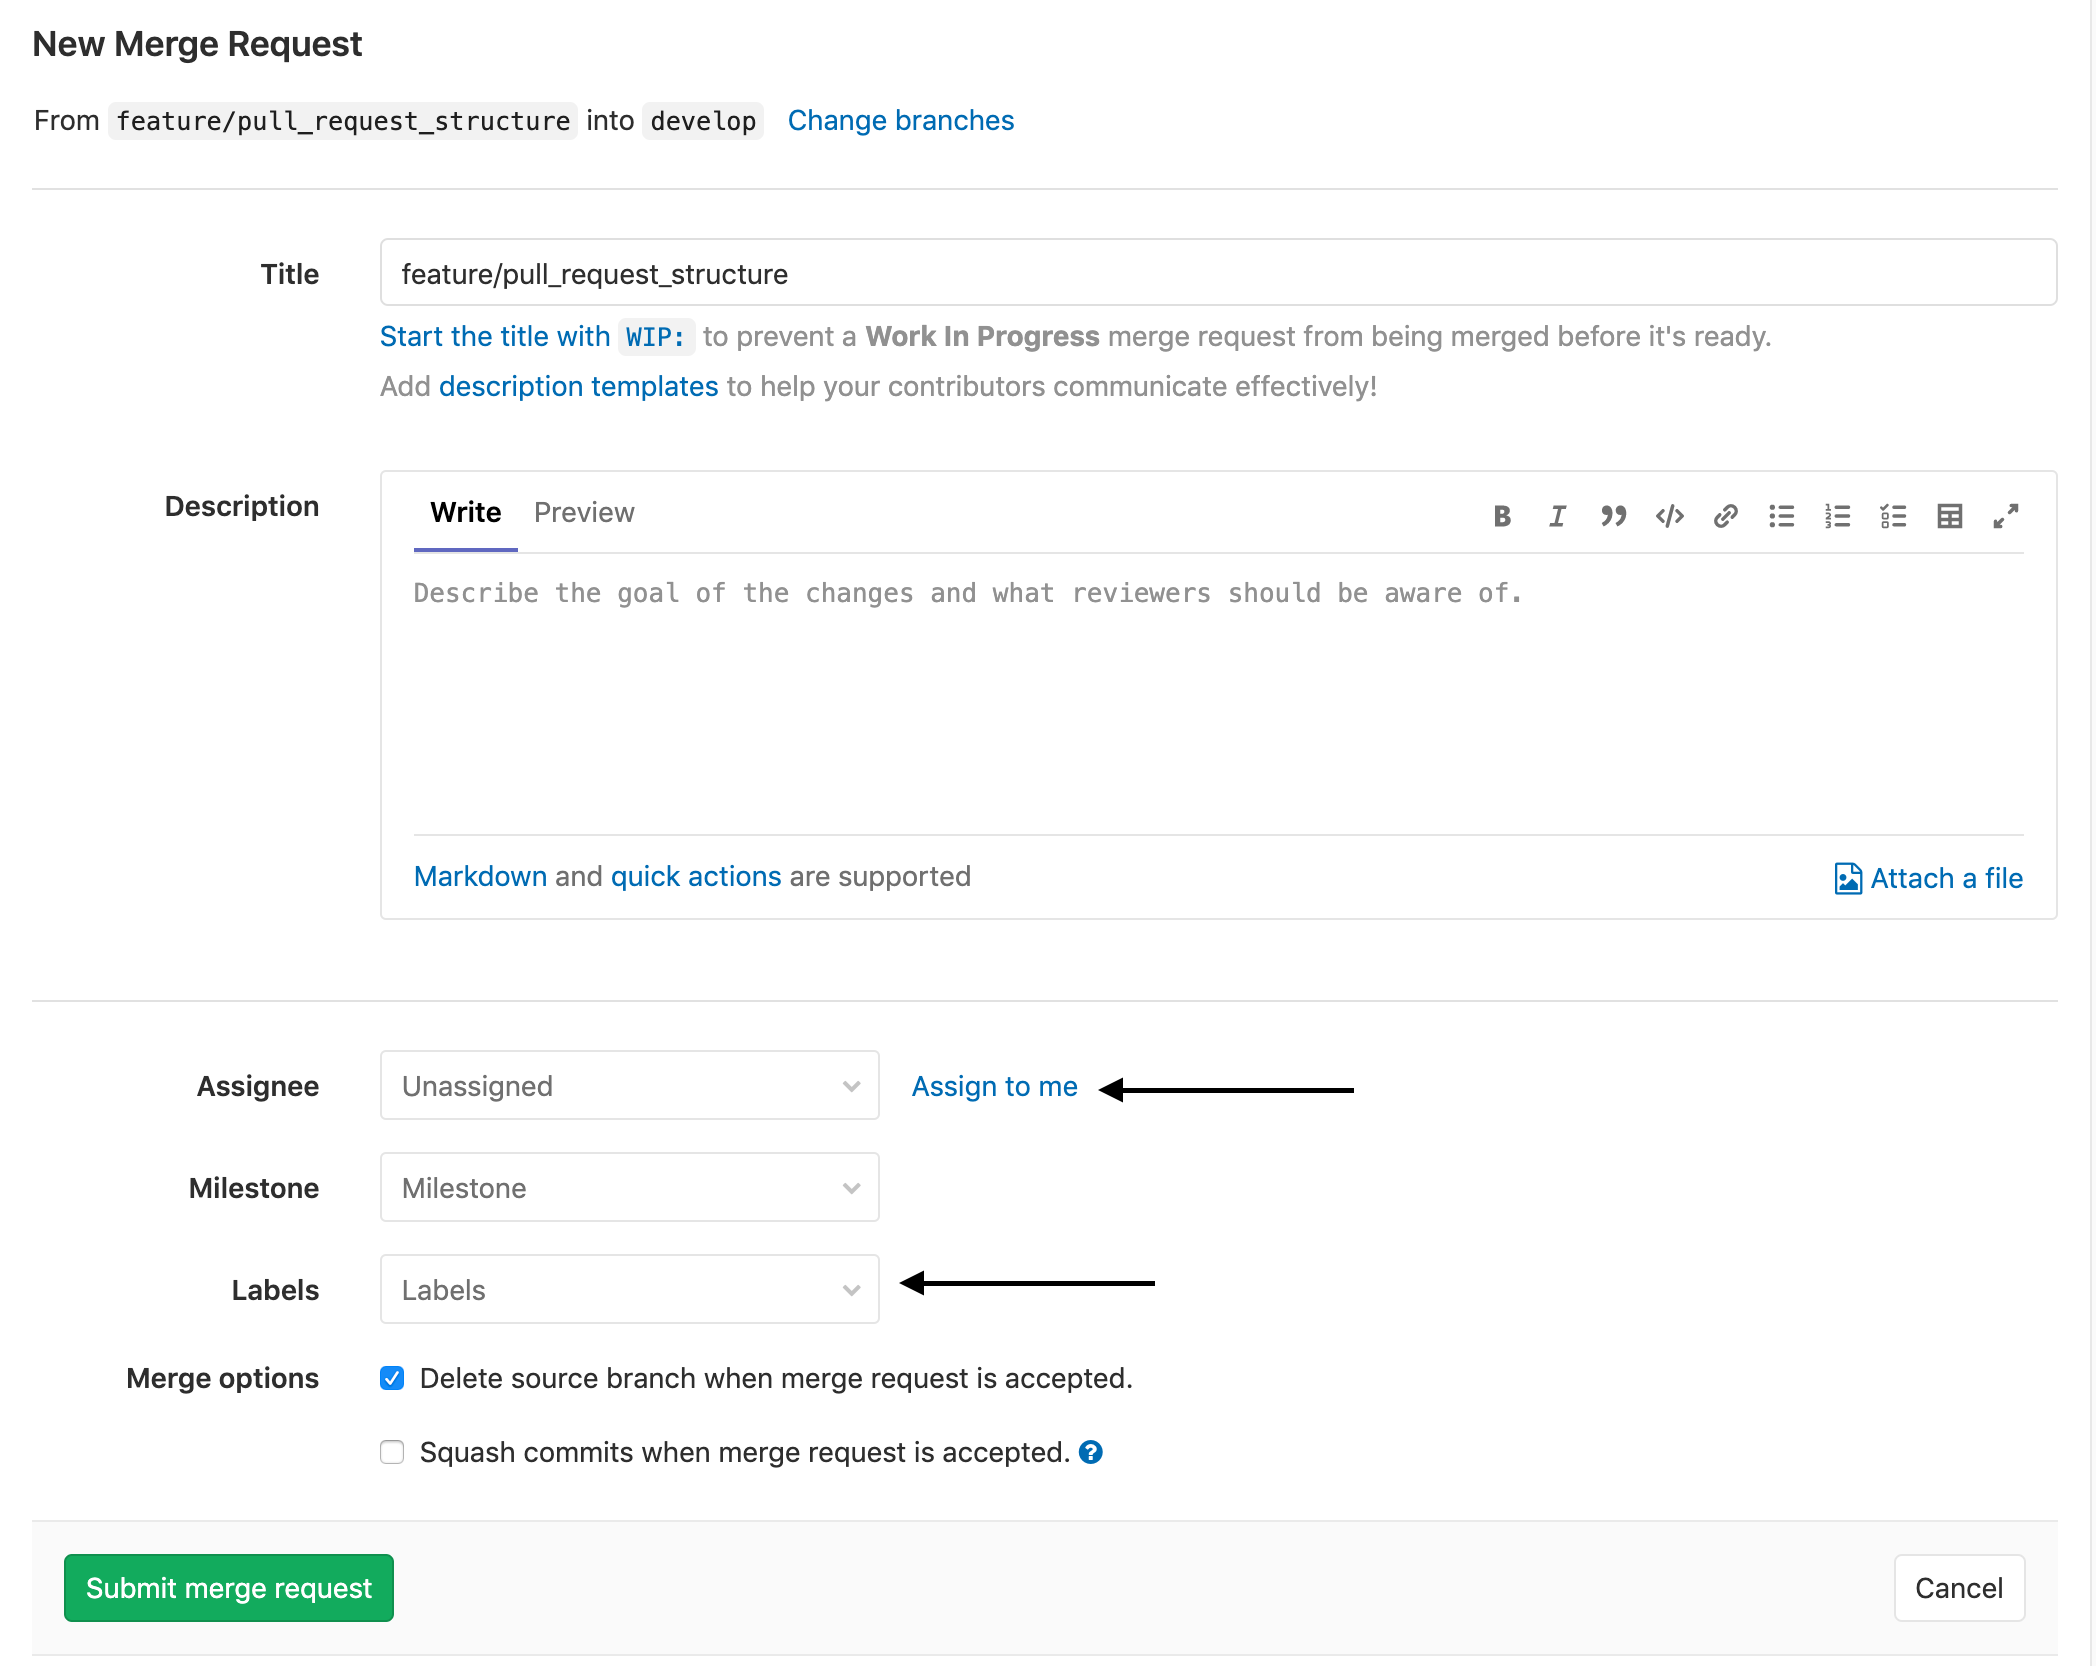
- In the title put the name of the branch
- Add description if necessary
- Assignee the task to your project manager
- Add the label corresponding
- Check the optin
Delete source branch when merge request is accepted - Finally Click on Submit merge request.
# Pop/Stash
# Stash
Temporarily shelves (or stashes) changes you've made to your working copy so you can work on something else, and then come back and re-apply them later on.
# Pop
Git stash pop takes a stashed change, removes it from the “stash stack”, and applies it to your current working tree.
# Tags
We use semantic versioning
In summary, the semantic version use 3 version groups to indicate if is a MAJOR, MINOR or PATCH change. Each version number indicates the following:
- MAJOR: This version is used when you make incompatible API changes
- MINOR: This version is used version when you add functionality in a backward-compatible manner
- PATCH: This version is used version when you make backward-compatible bug fixes.
For example: Here the init version is v1.0.0 that indicate was achieve a production-ready code on the master branch. After applying a hotfix the patch version of the tag is updated to v1.0.1. After the group of minor features was completed the release is merged to master and develop and minor version of the tag is updated to v1.1.0.
We use this with Automated Changelog
# Commits
Remember to include your emoji 👾👽👻 at the beginning of the tag description...
The commit message should be structured as follows:
# <type>[optional scope]: <emoji> <description>
# |<----  Using a Maximum Of 50 Characters  ---->|

# Explain why this change is being made
# |<----   Try To Limit Each Line to a Maximum Of 72 Characters   ---->|

# [optional body]

# |<----   Try To Limit Each Line to a Maximum Of 72 Characters   ---->|
# |<----   A commit that has a footer BREAKING CHANGE:, or appends a ! after the type/scope, introduces a breaking API change   --->|

# [optional footer(s)]

# Provide links or keys to any relevant tickets, articles or other resources
# Example: Github issue #23
2
3
4
5
6
7
8
9
10
11
12
13
14
15
The subject would be the description you use in the Tracking Guidelines!
# Type can be
feat     (new feature)
fix      (bug fix)
perf     (improves performance)
refactor (refactoring production code)
style    (formatting, missing semi colons, etc; no code change)
docs     (changes to documentation)
test     (adding or refactoring tests; no production code change)
chore    (updating grunt tasks etc; no production code change)
BREAKING CHANGE (introduces a breaking API change)
# Remember to
Capitalize the description line
Use the imperative mood in the description line
Do not end the description line with a period
Separate description from the body with a blank line
Use the body to explain what and why vs. how
Can use multiple lines with "-" for bullet points in the body
# Examples
# Commit message with description and breaking change footer
feat: 👾 Allow provided config object to extend other configs

BREAKING CHANGE: `extends` key in config file is now used for extending other config files
2
3
# Commit message with ! to draw attention to breaking change
refactor!: 👾 Drop support for Node 6
# Commit message with both ! and BREAKING CHANGE footer
refactor!: 👾 Drop support for Node 6

BREAKING CHANGE: refactor to use JavaScript features not available in Node 6.
2
3
# Commit message with no body
docs: 👾 Correct spelling of CHANGELOG
# Commit message with scope
feat(lang): 👾 Add polish language
# Commit message with multi-paragraph body and multiple footers
fix: 👾 Correct minor typos in code

  - See the issue for details

  - On typos fixed.

  Reviewed-by: Z
  Refs #133
2
3
4
5
6
7
8
# BIT
Bit is the platform for collaboration, isolated components across projects and repositories.
# What do you Need?
- Node 10.9+
# Setup Bit
- Create a Free bit.dev Account
- Create a component collection or ask for the organizacion collection of Plusteam
# Install Bit Cli
using NPM:
npm install bit-bin -g
# Login in your Bit Account
In your Favorite IDE open a project and type in the terminal
bit login
This will open your browser where you can log into your account. If you are already logged in, a success message will be displayed. You are now ready to start using Bit.
# Initialize Bit Workspace
$ bit init
successfully initialized a bit workspace.
2
- A new file named
.bitmaphas been created. This File tracks Bit components and only include a comment and a line with your bit version - a new section,
bithas been added to yourpackage.jsonfile with the following defaults for your project:
"bit": {
  "env": {},
  "componentsDefaultDirectory": "components/{name}",
  "packageManager": "npm"
}
2
3
4
5
# Install Compiler
First look for your project are different for each framework React, Angular, Vue
# Vue Compiler
# Javascript
bit import bit.envs/compilers/vue --compiler
# Typescript
bit import -c bit.envs/compilers/typescript
If you looking others compiler go here
Now You can check the package.json and verify that the compiler is installed by locating the following entry in the Bit section
     "env": {
      "compiler": "bit.envs/compilers/vue@X.X.X"
    },
2
3
or
     "env": {
      "compiler": "bit.envs/compilers/typescript@X.X.X"
    },
2
3
# Share a Component
 src/components/ProductList/component.vue
 src/components/ProductList/readme.MD
2
The project will need a folder with the components in the most of case is src/components using the bit cli we will add it
$ bit add src/components/Component --id component-test --main src/components/component/Component.vue
tracking component component-test:
added src/components/Component/Component.vue
added src/components/Component/readme.MD
2
3
4
bit addwill tell to bit which components will be add in our casesrc/components/component--idis the name of our component we callcomponent-test--mainwill tell to bit which one is our main file in this caseComponent.vue- The Component folder must have a readme.md file that contain all concerning about his functionality
With this we Track the component folder to bit.
You need to make sure that Bit properly tracks all of the files required for the component.
$ bit status
new components
(use "bit tag --all [version]" to lock a version with all your changes)
     > component-test ... ok
2
3
4
# Tag the component version
use the command bit tag component-test 0.0.1 to lock a version with all your changes
# Setting a version
bit tag --all --major          # Increment all modified and new components with a major version.
bit tag --all --minor          # Increment all modified and new components with a minor version.
bit tag --scope --patch  # Increment all components with a patch version.
bit tag --scope --patch  # Increment all components in the workspace with a patch version.
2
3
4
After that the component will start build process
$ bit tag component-test 0.0.1
⠅⡘ isolating component - component-test
⠧ ...

✔ isolating component - component-test
2
3
4
5
This results in the component name component-test followed by a list of file names. Those are the built files of the component.
# Export Component
To export the component to your bit.dev collection, we will use the export command and the full name of the collection, structured as <username>.<collection>:
$ bit export <username>.<collection>
exported 1 components to scope <username>.<collection>
2
The component is now visible in your collection on bit.dev. You can access it in https://bit.dev/<username>/<collection>
If you want to see all the components you have you can run
bit list
# Preview the Component
The component is also available on the bit.dev cloud. Go to https://bit.dev
# Install Component in Another Project
The component is stored in the Bit registry, so the full path to the component will be:
@bit/<username>.<collection name>.<component name>
Run the install command using npm:
npm install @bit/<username>.<collection name>.<component name> --save
you will see the change in the package.json
# Use in your application
Now you can use the component in your code, just like any other import.
import ComponentTest from '@bit/<username>.<collection name>.<component name>'

export default {
  name: 'app',
  components: {
    ComponentTest
  }
}
2
3
4
5
6
7
8
# Edit component from a repository with a bit component published
First use the command bit add src/components/Component --id component-test --main src/components/component/Component.vue assuming this path and component name.
Then Edit it and add a tag version like explained before
bit tag <id-component> <version> make sure check the collection to see what version is the next to avoid conflict
Finally export it
# Conflict with a tag version
Use the command bit checkout <version> <id-component> --ours to have the same version as bit, be sure to tag a higher version than bit before export it
# Automated Changelog
# Installation
`npm i --save-dev standard-version`
Add an npm run script to your package.json
{
  "scripts": {
    "release": "standard-version"
  }
}
2
3
4
5
If you are going to install in already project with versions you must need to run the following line
npm run release -- --release-as [next version]
To forget the automatic version bump and standard-version take it control
next version: If your project have 1.X.X put a version above that you have 2.0.0 if your version is under 0.X.X in next version put major this will put your version in 1.0.0
warning: If your project have a version above 1.X.X and you use major this will reset your version to 1.0.0
# Use
This will be used for by QA/PM only after the merge request pass the Code Review in the Branch Develop. to generate the tag version depend on your last commit Remember Supporting branches on Branches and the commit structure you saw in Commits
The tag release will be represented as Tags
BREAKING CHANGE (X.0.0) MAJOR
feat            (0.X.0) MINOR
fix             (0.0.X) PATCH
perf            (0.0.X) PATCH
refactor        (0.0.X) PATCH
style           (0.0.X) PATCH
docs            (0.0.X) PATCH
test            (0.0.X) PATCH
chore           (0.0.X) PATCH
If any of the previous type of commit has "!" symbol
example:
feat!: <emoji> <description>

fix!:  <emoji> <description>
Will be considered a Breaking Change and will release a Tag (X.0.0)
# Issues Management

In a Milestone (Remember we use SCRUM!, at the backlog, you will have issues assigned, coming up next we'll describe the normal flow of the issues.
# Doing
This Tag should be added as soon as you start working on them.
# Close the issue (Done)
When you finish your work you have to close the issue and assign a Ready for test tag to notify the QA team to proceed. They will test the work and remove the tag if the test is successfully passed.
# Blocked
If the issue could not be closed or something is blocking your progress you have to add the tag Blocked to notify the project manager.
# Header Code Comments
  ####################################################################
  ## Author:
  ## Licence:
  ## Copyright: (C) Copyright ${year} PLUSTEAM (http://plusteam.tech)
  ####################################################################
2
3
4
5